VBA for inserting multiple photos from a specified folder

SomeOrdinaryIndian

New Member
Joined
Jul 13, 2022
Messages
10
Office Version
  1. 365
Platform
  1. Windows
  2. MacOS
I know this has been asked many times here and in so many different ways before. Still unable to figure out a way to achieve this as per my needs.

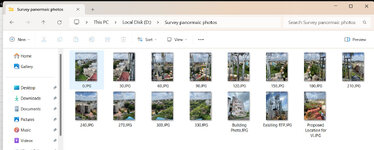
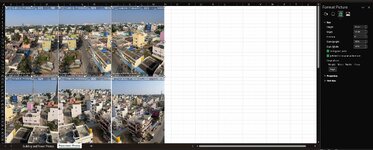
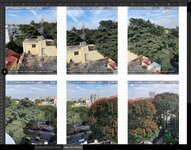
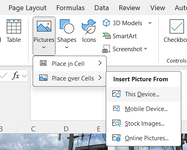
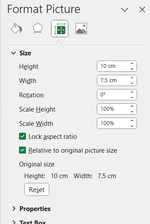
So, I'm looking for a VBA code to insert multiple photos and arrange them in specific manner(not inside the cells) and resize with custom width size. Found a thread close to what I was looking for Macro to Insert and resize picture but couldn't figure out inserting multiple photos and arranging in the required specific manner as shown in the attached screenshot. The code should check the photo's name inside the folder and arrange them in the order, like 0, 30, 60, 90... so on inside the sheet.

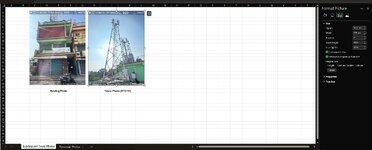
And the other photos with file names Building Photo.jpg, Proposed Location.jpg etc., should go to a different sheet in the same workbook and also in the specified location as shown in the screenshot.

Hope you got what I'm asking for. Thanks.
 

Attachments

  • Folder with pictures.jpg
    Folder with pictures.jpg
    153.5 KB · Views: 15
  • panormaic photos arrangement.jpg
    panormaic photos arrangement.jpg
    243.3 KB · Views: 14
  • panormaic photos arrangement 2.jpg
    panormaic photos arrangement 2.jpg
    232.8 KB · Views: 14
  • other photos arrangement.jpg
    other photos arrangement.jpg
    226.2 KB · Views: 13

Excel Facts

Quick Sum
Select a range of cells. The total appears in bottom right of Excel screen. Right-click total to add Max, Min, Count, Average.
Before running the macro you must adjust the following:

1. The names of the sheets in this line:
VBA Code:
  Set sh1 = Sheets("Sheet1")
  Set sh2 = Sheets("Sheet2")

2. If you want to set a height and width for all photos, put the values on these lines:
VBA Code:
  nWid = 120                  'Fit Width
  nHei = 140                  'Fit Height

3. If you do not want to set a height and width and you want the height and width of each photo to remain, then you will have to delete these lines from the macro:
VBA Code:
  nWid = 120                  'Fit Width
  nHei = 140                  'Fit Height
...
        .Width = nWid
        .Height = nHei
...
        .Width = nWid
        .Height = nHei

When you run the macro, you must select the folder where you have the photos.
VBA Code:
Sub Insert_photos()
  Dim sPath As String, sFile As String, sName As String
  Dim sh1 As Worksheet, sh2 As Worksheet
  Dim i As Long, lr As Long, n As Long, m As Long
  Dim nLef1%, nTop1%, nLef2%, nTop2%, nMax1%, nMax2&
  Dim nHei%, nWid%
  
  'Fit with your data
  Set sh1 = Sheets("Sheet1")
  Set sh2 = Sheets("Sheet2")
  nWid = 120                  'Fit Width
  nHei = 140                  'Fit Height
  
  With Application.FileDialog(msoFileDialogFolderPicker)
    .Title = "Select Folder"
    If .Show <> -1 Then Exit Sub
    sPath = .SelectedItems(1)
  End With
  
  Application.ScreenUpdating = False
  sh1.DrawingObjects.Delete
  sh2.DrawingObjects.Delete
  sh1.Range("A:B").ClearContents
  sh1.Range("A:B").NumberFormat = "@"
  
  sFile = Dir(sPath & "\" & "*.jp*")
  
  Do While sFile <> ""
    i = i + 1
    sh1.Range("A" & i).Value = Split(sFile, ".")(0)
    sh1.Range("B" & i).Value = Split(sFile, ".")(1)
    sFile = Dir()
  Loop
  
  lr = sh1.Range("A" & Rows.Count).End(3).Row
  sh1.Range("A1:B" & lr).Sort sh1.Range("A1"), _
    xlAscending, Header:=xlNo, DataOption1:=xlSortTextAsNumbers
  
  For i = 1 To lr
    sName = sPath & "\" & sh1.Range("A" & i).Value & "." & sh1.Range("B" & i).Value
    If IsNumeric(sh1.Range("A" & i).Value) Then
      With sh1.Pictures.Insert(sName)
        .ShapeRange.LockAspectRatio = msoFalse
        .Left = nLef1
        .Top = nTop1
        .Width = nWid
        .Height = nHei
        nLef1 = nLef1 + .Width + 10
        If .Height > nMax1 Then nMax1 = .Height
        n = n + 1
        If n = 3 Then
          nTop1 = nTop1 + nMax1 + 10
          n = 0
          nLef1 = 0
        End If
      End With
    Else
      With sh2.Pictures.Insert(sName)
        .ShapeRange.LockAspectRatio = msoFalse
        .Left = nLef2
        .Top = nTop2
        .Width = nWid
        .Height = nHei
        nLef2 = nLef2 + .Width + 10
        If .Height > nMax2 Then nMax2 = .Height
        m = m + 1
        If m = 3 Then
          nTop2 = nTop2 + nMax2 + 10
          m = 0
          nLef2 = 0
        End If
      End With
    End If
  Next
  sh1.Range("A:B").ClearContents

  Application.ScreenUpdating = True
End Sub

----- --
Let me know the result and I'll get back to you as soon as I can.
Sincerely
Dante Amor
----- --
 
Upvote 0
Before running the macro you must adjust the following:

1. The names of the sheets in this line:
VBA Code:
  Set sh1 = Sheets("Sheet1")
  Set sh2 = Sheets("Sheet2")

2. If you want to set a height and width for all photos, put the values on these lines:
VBA Code:
  nWid = 120                  'Fit Width
  nHei = 140                  'Fit Height

3. If you do not want to set a height and width and you want the height and width of each photo to remain, then you will have to delete these lines from the macro:
VBA Code:
  nWid = 120                  'Fit Width
  nHei = 140                  'Fit Height
...
        .Width = nWid
        .Height = nHei
...
        .Width = nWid
        .Height = nHei

When you run the macro, you must select the folder where you have the photos.
VBA Code:
Sub Insert_photos()
  Dim sPath As String, sFile As String, sName As String
  Dim sh1 As Worksheet, sh2 As Worksheet
  Dim i As Long, lr As Long, n As Long, m As Long
  Dim nLef1%, nTop1%, nLef2%, nTop2%, nMax1%, nMax2&
  Dim nHei%, nWid%
 
  'Fit with your data
  Set sh1 = Sheets("Sheet1")
  Set sh2 = Sheets("Sheet2")
  nWid = 120                  'Fit Width
  nHei = 140                  'Fit Height
 
  With Application.FileDialog(msoFileDialogFolderPicker)
    .Title = "Select Folder"
    If .Show <> -1 Then Exit Sub
    sPath = .SelectedItems(1)
  End With
 
  Application.ScreenUpdating = False
  sh1.DrawingObjects.Delete
  sh2.DrawingObjects.Delete
  sh1.Range("A:B").ClearContents
  sh1.Range("A:B").NumberFormat = "@"
 
  sFile = Dir(sPath & "\" & "*.jp*")
 
  Do While sFile <> ""
    i = i + 1
    sh1.Range("A" & i).Value = Split(sFile, ".")(0)
    sh1.Range("B" & i).Value = Split(sFile, ".")(1)
    sFile = Dir()
  Loop
 
  lr = sh1.Range("A" & Rows.Count).End(3).Row
  sh1.Range("A1:B" & lr).Sort sh1.Range("A1"), _
    xlAscending, Header:=xlNo, DataOption1:=xlSortTextAsNumbers
 
  For i = 1 To lr
    sName = sPath & "\" & sh1.Range("A" & i).Value & "." & sh1.Range("B" & i).Value
    If IsNumeric(sh1.Range("A" & i).Value) Then
      With sh1.Pictures.Insert(sName)
        .ShapeRange.LockAspectRatio = msoFalse
        .Left = nLef1
        .Top = nTop1
        .Width = nWid
        .Height = nHei
        nLef1 = nLef1 + .Width + 10
        If .Height > nMax1 Then nMax1 = .Height
        n = n + 1
        If n = 3 Then
          nTop1 = nTop1 + nMax1 + 10
          n = 0
          nLef1 = 0
        End If
      End With
    Else
      With sh2.Pictures.Insert(sName)
        .ShapeRange.LockAspectRatio = msoFalse
        .Left = nLef2
        .Top = nTop2
        .Width = nWid
        .Height = nHei
        nLef2 = nLef2 + .Width + 10
        If .Height > nMax2 Then nMax2 = .Height
        m = m + 1
        If m = 3 Then
          nTop2 = nTop2 + nMax2 + 10
          m = 0
          nLef2 = 0
        End If
      End With
    End If
  Next
  sh1.Range("A:B").ClearContents

  Application.ScreenUpdating = True
End Sub

----- --
Let me know the result and I'll get back to you as soon as I can.
Sincerely
Dante Amor
----- --

Thank you for the code! This is just how I wanted it! Appreaciate it!

But I have issue with saving the file with the actual photos after adding them inside the sheets. How do I save the actual photos(it'll be around ~4mb) inside the workbook as xlsx and without the macros?
 
Upvote 0
How do I save the actual photos(it'll be around ~4mb) inside the workbook as xlsx and without the macros?


After this line:
VBA Code:
  sh1.Range("A:B").ClearContents

Add these lines and adjust the file name:
VBA Code:
  Sheets(Array(sh1.Name, sh2.Name)).Copy
  ActiveWorkbook.SaveAs ThisWorkbook.Path & "\" & "File with photos.xlsx"

😇
 
Upvote 0
After this line:
VBA Code:
  sh1.Range("A:B").ClearContents

Add these lines and adjust the file name:
VBA Code:
  Sheets(Array(sh1.Name, sh2.Name)).Copy
  ActiveWorkbook.SaveAs ThisWorkbook.Path & "\" & "File with photos.xlsx"

😇

Thanks. I believe its a code to save the file automatically after the macros is ran with and a desired name. The above code is handy and good to have at times.

But sorry for not being more clear. I need to save the whole workbook with the actual photos included in it after it has been imported and not like a symlink. The above code still saves the workbook(only ~12KB) with symlink of the photos directed to their original folder which is not how I intend to.

I have attached a screenshot showing how we manually insert pictures and then when we save the workbook the whole pictures are there inside the file without any symlink(the size depends on how many pictures are present inside the workbook and their size which would be around 3-5MB) ). Hope this clears it!
And Thanks again for your time!
 

Attachments

  • Screenshot 2024-08-07 000726.png
    Screenshot 2024-08-07 000726.png
    54.3 KB · Views: 3
Upvote 0
not like a symlink
I don't understand what you mean by that.

In my tests a new book is created as xlsx (without macros), with 2 sheets, the first sheet with photos arranged in ascending order of 3 by 3; and on the second page, with photos, where name is not a number. Just as you put it in your original post.


Found a thread close to what I was looking for Macro to Insert and resize picture
In that link, the line they use to insert images is this: Set pic = Worksheets("Sheet1").Pictures.Insert(fName)

In my macro I use the same instruction: sh1.Pictures.Insert(sName)


Here is an example of the new book that the macro generates for me:
1722971863390.png


I'm afraid if it's not what you need, it wasn't clear from your original post. You did not put how you wanted the images on the sheet and you did not put that you wanted to save a file as xlsx.
 
Upvote 0
I don't understand what you mean by that.

In my tests a new book is created as xlsx (without macros), with 2 sheets, the first sheet with photos arranged in ascending order of 3 by 3; and on the second page, with photos, where name is not a number. Just as you put it in your original post.


In that link, the line they use to insert images is this: Set pic = Worksheets("Sheet1").Pictures.Insert(fName)

In my macro I use the same instruction: sh1.Pictures.Insert(sName)


Here is an example of the new book that the macro generates for me:
View attachment 115049

I'm afraid if it's not what you need, it wasn't clear from your original post. You did not put how you wanted the images on the sheet and you did not put that you wanted to save a file as xlsx.

Yes. I didn't know how VBA code worked or handles pictures and saving them.

So, the saved file would be sent to someone and they won't be having the same pictures in the same directory and in the same name as mine.

Anyway thanks for your time!
 
Upvote 0
I don't understand what you mean by that.

In my tests a new book is created as xlsx (without macros), with 2 sheets, the first sheet with photos arranged in ascending order of 3 by 3; and on the second page, with photos, where name is not a number. Just as you put it in your original post.


In that link, the line they use to insert images is this: Set pic = Worksheets("Sheet1").Pictures.Insert(fName)

In my macro I use the same instruction: sh1.Pictures.Insert(sName)


Here is an example of the new book that the macro generates for me:
View attachment 115049

I'm afraid if it's not what you need, it wasn't clear from your original post. You did not put how you wanted the images on the sheet and you did not put that you wanted to save a file as xlsx.

Your code is exactly what I need and does what I wanted. Its just that I'm looking a way to insert the images rather than linking them
 
Upvote 0
Try this:

VBA Code:
Sub Insert_photos()
  Dim sPath As String, sFile As String, sName As String
  Dim sh1 As Worksheet, sh2 As Worksheet
  Dim i As Long, lr As Long, n As Long, m As Long
  Dim nLef1%, nTop1%, nLef2%, nTop2%, nMax1%, nMax2&
  Dim nHei%, nWid%
  
  'Fit with your data
  Set sh1 = Sheets("Sheet1")
  Set sh2 = Sheets("Sheet2")
  nWid = 120                  'Fit Width
  nHei = 140                  'Fit Height
  
  With Application.FileDialog(msoFileDialogFolderPicker)
    .Title = "Select Folder"
    If .Show <> -1 Then Exit Sub
    sPath = .SelectedItems(1)
  End With
  
  Application.ScreenUpdating = False
  Application.DisplayAlerts = False
  
  sh1.DrawingObjects.Delete
  sh2.DrawingObjects.Delete
  sh1.Range("A:B").ClearContents
  sh1.Range("A:B").NumberFormat = "@"
  
  sFile = Dir(sPath & "\" & "*.jp*")
  
  Do While sFile <> ""
    i = i + 1
    sh1.Range("A" & i).Value = Split(sFile, ".")(0)
    sh1.Range("B" & i).Value = Split(sFile, ".")(1)
    sFile = Dir()
  Loop
  
  lr = sh1.Range("A" & Rows.Count).End(3).Row
  sh1.Range("A1:B" & lr).Sort sh1.Range("A1"), _
    xlAscending, Header:=xlNo, DataOption1:=xlSortTextAsNumbers
  
  For i = 1 To lr
    sName = sPath & "\" & sh1.Range("A" & i).Value & "." & sh1.Range("B" & i).Value
    If IsNumeric(sh1.Range("A" & i).Value) Then

      With sh1.Shapes.AddPicture(sName, False, True, 1, 1, 1, 1)
        .LockAspectRatio = msoFalse
        .Left = nLef1
        .Top = nTop1
        .Width = nWid
        .Height = nHei
        nLef1 = nLef1 + .Width + 10
        If .Height > nMax1 Then nMax1 = .Height
        n = n + 1
        If n = 3 Then
          nTop1 = nTop1 + nMax1 + 10
          n = 0
          nLef1 = 0
        End If
      End With
    Else
      With sh2.Shapes.AddPicture(sName, False, True, 1, 1, 1, 1)
        .LockAspectRatio = msoFalse
        .Left = nLef2
        .Top = nTop2
        .Width = nWid
        .Height = nHei
        nLef2 = nLef2 + .Width + 10
        If .Height > nMax2 Then nMax2 = .Height
        m = m + 1
        If m = 3 Then
          nTop2 = nTop2 + nMax2 + 10
          m = 0
          nLef2 = 0
        End If
      End With
    End If
  Next
  sh1.Range("A:B").ClearContents
  
  Sheets(Array(sh1.Name, sh2.Name)).Copy
  ActiveWorkbook.SaveAs ThisWorkbook.Path & "\" & "File with photos.xlsx"

  Application.ScreenUpdating = True
End Sub
 
Upvote 0
Solution
Try this:

VBA Code:
Sub Insert_photos()
  Dim sPath As String, sFile As String, sName As String
  Dim sh1 As Worksheet, sh2 As Worksheet
  Dim i As Long, lr As Long, n As Long, m As Long
  Dim nLef1%, nTop1%, nLef2%, nTop2%, nMax1%, nMax2&
  Dim nHei%, nWid%
 
  'Fit with your data
  Set sh1 = Sheets("Sheet1")
  Set sh2 = Sheets("Sheet2")
  nWid = 120                  'Fit Width
  nHei = 140                  'Fit Height
 
  With Application.FileDialog(msoFileDialogFolderPicker)
    .Title = "Select Folder"
    If .Show <> -1 Then Exit Sub
    sPath = .SelectedItems(1)
  End With
 
  Application.ScreenUpdating = False
  Application.DisplayAlerts = False
 
  sh1.DrawingObjects.Delete
  sh2.DrawingObjects.Delete
  sh1.Range("A:B").ClearContents
  sh1.Range("A:B").NumberFormat = "@"
 
  sFile = Dir(sPath & "\" & "*.jp*")
 
  Do While sFile <> ""
    i = i + 1
    sh1.Range("A" & i).Value = Split(sFile, ".")(0)
    sh1.Range("B" & i).Value = Split(sFile, ".")(1)
    sFile = Dir()
  Loop
 
  lr = sh1.Range("A" & Rows.Count).End(3).Row
  sh1.Range("A1:B" & lr).Sort sh1.Range("A1"), _
    xlAscending, Header:=xlNo, DataOption1:=xlSortTextAsNumbers
 
  For i = 1 To lr
    sName = sPath & "\" & sh1.Range("A" & i).Value & "." & sh1.Range("B" & i).Value
    If IsNumeric(sh1.Range("A" & i).Value) Then

      With sh1.Shapes.AddPicture(sName, False, True, 1, 1, 1, 1)
        .LockAspectRatio = msoFalse
        .Left = nLef1
        .Top = nTop1
        .Width = nWid
        .Height = nHei
        nLef1 = nLef1 + .Width + 10
        If .Height > nMax1 Then nMax1 = .Height
        n = n + 1
        If n = 3 Then
          nTop1 = nTop1 + nMax1 + 10
          n = 0
          nLef1 = 0
        End If
      End With
    Else
      With sh2.Shapes.AddPicture(sName, False, True, 1, 1, 1, 1)
        .LockAspectRatio = msoFalse
        .Left = nLef2
        .Top = nTop2
        .Width = nWid
        .Height = nHei
        nLef2 = nLef2 + .Width + 10
        If .Height > nMax2 Then nMax2 = .Height
        m = m + 1
        If m = 3 Then
          nTop2 = nTop2 + nMax2 + 10
          m = 0
          nLef2 = 0
        End If
      End With
    End If
  Next
  sh1.Range("A:B").ClearContents
 
  Sheets(Array(sh1.Name, sh2.Name)).Copy
  ActiveWorkbook.SaveAs ThisWorkbook.Path & "\" & "File with photos.xlsx"

  Application.ScreenUpdating = True
End Sub

Yep. This is it! Thanks!

A little request. Could you add dialog prompt for saving the file to the code instead of automatically saving it? And also add "lock aspect ratio" code to the pictures?
 

Attachments

  • Screenshot 2024-08-07 014252.png
    Screenshot 2024-08-07 014252.png
    18.6 KB · Views: 3
Upvote 0

Forum statistics

Threads
1,221,080
Messages
6,157,829
Members
451,442
Latest member
jennybell

We've detected that you are using an adblocker.

We have a great community of people providing Excel help here, but the hosting costs are enormous. You can help keep this site running by allowing ads on MrExcel.com.
Allow Ads at MrExcel

Which adblocker are you using?

Disable AdBlock

Follow these easy steps to disable AdBlock

1)Click on the icon in the browser’s toolbar.
2)Click on the icon in the browser’s toolbar.
2)Click on the "Pause on this site" option.
Go back

Disable AdBlock Plus

Follow these easy steps to disable AdBlock Plus

1)Click on the icon in the browser’s toolbar.
2)Click on the toggle to disable it for "mrexcel.com".
Go back

Disable uBlock Origin

Follow these easy steps to disable uBlock Origin

1)Click on the icon in the browser’s toolbar.
2)Click on the "Power" button.
3)Click on the "Refresh" button.
Go back

Disable uBlock

Follow these easy steps to disable uBlock

1)Click on the icon in the browser’s toolbar.
2)Click on the "Power" button.
3)Click on the "Refresh" button.
Go back
Back
Top