Update Workbook 1 using information from Workbook 2 while preserving information on Workbook 1

JenJarchow

New Member
Joined
Feb 25, 2022
Messages
8
Office Version
  1. 2016
Platform
  1. Windows
Hello!

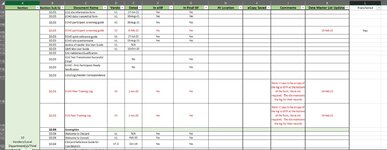
I am trying to design a VBA that will allow me to update Workbook 1 (Site Master Tracker Template) from Workbook 2 (SUSAR Master List_DO NOT EDIT). Easy enough, except I use Workbook 1 to cross check files at a location and when I update Workbook 1 with the new information from Workbook 2 (usually updated documents) I want to preserve the information in Workbook 1 and only add the NEW information from Workbook 2.

In Workbook 1 the information I want to preserve is found in columns A-K. In Workbook 2 the information I want to add are the new rows that have been inserted and colored red. Ideally I'd like to insert the new red rows and leave the other rows untouched. I want to be able to continuously update Workbook 1 whenever Workbook 2 has been updated with new rows. I hope this makes sense! Sorry I can't upload the workbooks themselves I hope the pictures suffice!
 

Attachments

  • Workbook 1.JPG
    Workbook 1.JPG
    131.8 KB · Views: 17
  • Workbook2.JPG
    Workbook2.JPG
    145.9 KB · Views: 20
Oh wow this is ALMOST perfect! I just ran it and it preserved the information that was already present which I love! It also created the "Yes" item like you said. However it did not capture all of the new "red" documents from the source workbook. It captured the document in red listed in row 109, but the other four docs in rows 118, 119, 144, and 171 it did not catch. I've attached a jpg showing the filtered four non-transferred docs, and another showing documents around those that did not transfer. What are your thoughts?

I'm so excited! This is so close to being perfect! :D
 

Attachments

  • jpg 1.JPG
    jpg 1.JPG
    86 KB · Views: 7
  • jpg 2.JPG
    jpg 2.JPG
    199.4 KB · Views: 7
Upvote 0

Excel Facts

How can you automate Excel?
Press Alt+F11 from Windows Excel to open the Visual Basic for Applications (VBA) editor.
Oh wow this is ALMOST perfect! I just ran it and it preserved the information that was already present which I love! It also created the "Yes" item like you said. However it did not capture all of the new "red" documents from the source workbook. It captured the document in red listed in row 109, but the other four docs in rows 118, 119, 144, and 171 it did not catch. I've attached a jpg showing the filtered four non-transferred docs, and another showing documents around those that did not transfer. What are your thoughts?

I'm so excited! This is so close to being perfect! :D
Do the "Document Names" of the lines it has missed appear in the destination workbook. if no then this is why it hasnt moved across.
 
Upvote 0
Hello!

Two of the four, red document names do appear in the destination book (because its the same document but a newer version number) and those transfer over (yay!). The other two are unique documents added to the list later on and need to be checked at the location. They do not appear in the destination folder. It was my hope that all new documents, with a date in column k would appear in the destination folder regardless of name. Is there a way to have the code move rows into the destination workbook by searching for color? Or by an entry in column K?
This is why you need to be specific in your queries. It is entirely possible to move them across (but you said UPDATES). The issue would be what section do you want them placed in as I notice that your destination workbook groups documents by column A
 
Upvote 0
This is why you need to be specific in your queries. It is entirely possible to move them across (but you said UPDATES). The issue would be what section do you want them placed in as I notice that your destination workbook groups documents by column A
I'm sorry I wasn't clearer when I originally posted and I appreciate you sticking with me through this!
Not column A. I'd prefer column B which is a bit more specific, however there may be issues with duplicate values because as you can see in my previous posts there are often times multiple docs in the same area.

So continuing on then we have column C. There are documents named the same, however, slightly changing the name would work to differentiate them and prevent any issues with duplicates not being picked up. So let's try column C. Ultimately I'll defer to you though, whatever is easiest to code in your opinion!
 
Upvote 0

Forum statistics

Threads
1,223,240
Messages
6,170,951
Members
452,368
Latest member
jayp2104

We've detected that you are using an adblocker.

We have a great community of people providing Excel help here, but the hosting costs are enormous. You can help keep this site running by allowing ads on MrExcel.com.
Allow Ads at MrExcel

Which adblocker are you using?

Disable AdBlock

Follow these easy steps to disable AdBlock

1)Click on the icon in the browser’s toolbar.
2)Click on the icon in the browser’s toolbar.
2)Click on the "Pause on this site" option.
Go back

Disable AdBlock Plus

Follow these easy steps to disable AdBlock Plus

1)Click on the icon in the browser’s toolbar.
2)Click on the toggle to disable it for "mrexcel.com".
Go back

Disable uBlock Origin

Follow these easy steps to disable uBlock Origin

1)Click on the icon in the browser’s toolbar.
2)Click on the "Power" button.
3)Click on the "Refresh" button.
Go back

Disable uBlock

Follow these easy steps to disable uBlock

1)Click on the icon in the browser’s toolbar.
2)Click on the "Power" button.
3)Click on the "Refresh" button.
Go back
Back
Top