Save Excel Data as a Text File
October 25, 2021 - by Bill Jelen

Problem: I am working with an Excel file. I need to produce a file for another application to read, but that application can read only .txt files.
Strategy: You have a couple options. Typically, the other application will either want the columns to be separated by a fixed number of spaces or separated by commas. Files with columns separated by commas are called comma-separated values, or CSV, files. CSV files are easier to create than space-separated files. Here’s how you create a CSV file:
1. Select File, Save As. In the Save as Type dropdown, choose CSV (Comma delimited) (*.csv).
2. Click the Save button. Excel will generally warn you that you are saving the file in a format that will leave out incompatible features. This means that you should re-save the file as an Excel file later in order to keep the compatible features. Important: Only the current worksheet is saved in the CSV file. If you have multiple worksheets in the workbook, save each worksheet separately.
-
3. After saving the file as CSV, use Save As to save the file as an Excel file.
Additional Details: Before 2018, Excel would nag you when you try to save CSV files. This could get annoying if you frequently save CSV files. Go to File, Options, Save and turn off this setting.

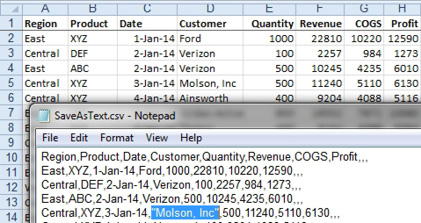
Results: The figure below shows the created file as it appears when edited with Notepad. Pay particular attention to the “Molson, Inc” entry. Because cell D5 already contained a comma, Excel was smart enough to surround Molson, Inc with quotation marks.

Gotcha: The dates in column C are written to the file in the same format as they were shown on the worksheet. Most programs will not understand a date such as 1-Jan-04. Check the documentation of the program that will import the information, and if you need to, format column C to appear as mm/dd/yyyy before exporting to CSV.
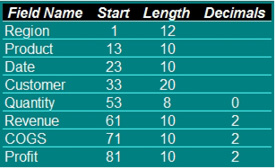
Alternate Strategy: Another option is to create a file in which each field is supposed to take a fixed number of characters. You might need to use this method to produce a file which is to be imported by another application. In this case, the other application will usually give you a file specification for you to follow. It might indicate the following:

In this case, you follow these steps:
1. Go through the columns in the worksheet, resetting the column widths. If the other program expects the Region field to be 12 characters wide, for example, select column A and then choose Home, Format, Column Width and set the Column Width text box to 12.
2. Format the dates as specified by the other system. Make sure the Revenue, Cost, and Profit columns show two decimal places. The other system probably will not want field headings, so delete row 1.
3. Select File, Save As. In the Save as Type dropdown, select Formatted Text (Space Delimited).
Gotcha: Excel changes the file name so that it has a .prn extension. Even if you try to change the extension to .txt here, Excel will still save the file with the extension .prn. It is best to leave it as .prn and then rename it in Windows Explorer.
4. When Excel warns you that you will lose features if you have multiple sheets, click Yes.
The figure below shows the resulting file, viewed in Notepad.

This article is an excerpt from Power Excel With MrExcel
Title photo by Joseph Gonzalez on Unsplash
