Remove Blanks from a Range While Keeping the Original Sequence
October 14, 2022 - by Bill Jelen

Problem: Someone has given me data pasted from Word. There are a number of blank cells in the list. I want to eliminate the blank rows, but I need to keep the data in the original sequence.
Strategy: The trick described in “Remove Blank Rows from a Range”—sorting data to move the blanks to the end—is effective, but it destroys the original sequence of the range. Before sorting, you can add a temporary column with the original sequence numbers so that the data can be sorted back. Follow these steps:
1. Insert a new row 1. Place the cell pointer in cell A1 and then select Home, Insert, Insert Sheet Rows. Because you have only one cell selected, only one row will be inserted.
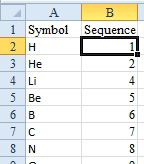
2. In A1, enter a heading such as Symbol. In cell B1, enter a heading such as Sequence. Apply the cell style Heading 4 by using the Cell Styles gallery on the Home tab.
-
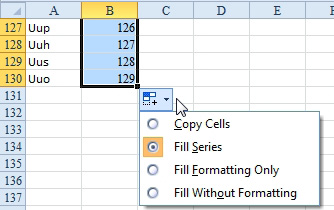
3. In cell B2, enter the number 1. Select B2. Hold down the Ctrl key while you drag the fill handle to the last row that contains data. The series 1, 2, 3 will extend down to 129 in row 130. Gotcha: If you get a series of 1s instead of 1, 2, 3, then you did not hold down the Ctrl key. Open the Auto Fill Options icon in C131 and choose Fill Series.

Note: If the Auto Fill Options icon is obscuring some other data, it is fairly difficult to dismiss. One method is to resize any column.
4. Next, sort the data based on column A by selecting a single cell in column A and pressing the AZ button on the Data tab.
5. Press the End key and then the Down Arrow key to ride the range down to the last cell in A that contains data. Delete the rows below this last cell by highlighting the row numbers, right-clicking, and choosing Delete. (These are the blank cells. It is important to delete the sequence numbers from B for the blank cells so that they do not sort back into the data in the next step.)
6. Move the cell pointer to any value in column B. Click the AZ button on the Data tab to sort the data into the original sequence, without the blanks.

7. Delete the temporary column B by selecting Home, Delete, Delete Sheet Columns.
8. Delete the temporary row 1 by moving the cell pointer to A1 and selecting Home, Delete, Delete Sheet Rows.
Results: The blanks will be removed from the list, and the list will retain the original sequence.
Alternate Strategy: The previous steps work particularly well when your data set has many columns and you need to delete based on one column. If you truly have a data set that has a single column, try this faster method:
1. Select the range of data.
2. Select Home, Find & Select, Go To Special and in the Go To Special dialog, select Blanks and click OK.
3. Select Home, Delete, Delete Cells, select Shift Cells Up, and click OK.
Excel will delete all the blanks and move the lower cells up.
Alternate Strategy: You can solve this with the Filter. Follow these steps:
1. Add a heading.
2. Select the entire data set.
3. Select Data, Filter. Open the Filter dropdown for the heading. Uncheck Select All. Scroll all the way to the bottom to choose (Blanks).
4. Re-select the visible rows, excluding the heading.
5. Select Home, Delete, Delete Sheet Rows.
6. Select Clear from the Sort & Filter group on the Data ribbon tab.
This article is an excerpt from Power Excel With MrExcel
Title photo by Roman Koester on Unsplash
