Prepare Your Excel Data for Power BI
April 17, 2023 - by Bill Jelen

In the early days of Power BI, everything was done online. You would upload your data to PowerBI.Microsoft.com and try to use clunky online tools to build your dashboard. Then, during 2016, Microsoft released PowerBI Desktop.
This application allows you to do all of the dashboard design locally on your computer. Dashboards are saved as .pbix files.
Power BI can import Excel files, but the data should either be stored in a named range or as a Table.
While table is a generic term, when this book refers to a Table, it means that you’ve used either Ctrl+T or Format as Table to convert your range into a Table.
To qualify as a Table, your data should have one row of headings above the data. You should have no blank headings. If the headings are not in Row 1, then make sure to leave a blank row between the headings and any title cells in the worksheet. There should be no blank rows in your data.
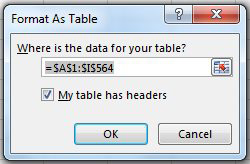
Select one cell in the data and press Ctrl+T. Excel will identify the extent of the data. Make sure that the My Data Has Headings box is checked and click OK.

By default, Excel will automatically assign unimaginative names such as Table1. Go to the Table Tools Design tab. You will see the table name in the top left.

Click in the box and type a logical name for the table. Do not include spaces in the name. Sales, Data, SalesData, Geography, GeographyLookup are all fine table names.

This article is an excerpt from Power Excel With MrExcel
Title photo by Tim Mossholder on Unsplash
