
Excel 2024: Word for Excellers
January 27, 2025 - by Bill Jelen

Note
Katie Sullivan is a project manager on the Microsoft Word team. For this tip in the book, I turn the podium over to Katie.
While Excel fans sometimes tease that Word and PowerPoint are freeware apps that come with Excel, there are times when Microsoft Word offers a feature that Excel does not. In those cases, it makes sense to copy your data from Excel, paste to Word, do the command, then copy back to Excel. Here are some examples of techniques that are better handled in Word than in Excel.
Technique 1: Convert to Upper, Lower, Proper
If you have to convert from uppercase to lowercase or proper case, Word has a keystroke shortcut. Copy the data to Word and toggle the case using Shift+F3.
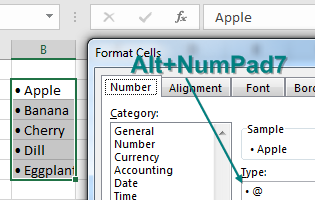
Technique 2: Add Bullets
If you want to add bullets to Excel cells, it is far easier in Word than in Excel. Copy the cells to Word and apply a bullet style. Copy from Word and paste back to Excel. You might have to use the Reduce Indent icon a few times.
Tip
Since the first edition of this book, I learned of an easier way to do bullets in Excel. If you have a range of cells that contain text, select the range and press Ctrl+1 to open the Format Cells dialog. Then, on the Number tab, choose Custom from the list on the left. Click in the Type box and clear out whatever is there. Hold down the Alt key while pressing the 7 on the numeric keypad. A bullet should appear. Type a space and then an @.
Technique 3: Visualize and Color Formulas
If you have a massively long formula, say one with 10 nested IF statements, you can paste to Word and use colors and Shift + Enter to space the formula to help make sense of it. (One rebuttal from the Excel team: You can expand the formula bar and use Alt + Enter to split a formula into many lines. Or, you can use the great RefTreeAnalyser add-in from Jan Karel Pieterse; see https://mrx.cl/jkpformula.)
Technique 4: Faster SmartArt
Word offers the Convert Text to SmartArt option. While Excel offers SmartArt, too, it is not very handy there because you have to copy the entries one at a time into the SmartArt pane.
Technique 5: Extract Data from a PDF
Say that someone has an Excel workbook and saves that workbook as a PDF. They send it to you. This is annoying, and clearly they don't want you to reuse the data. If you open the PDF in Acrobat Reader, copy the data, and paste to Excel, it will unwind into a single column. But here is the secret: Paste that data to Word first. The rows and columns will paste properly. You can then copy from Word and paste back into Excel. (If you are stuck in a pre-2013 version of Office, I recommend Able2Extract: https://mrx.cl/pdftoxl.)
The original data is shown on the left below, and you can see on the right and how it looks when you paste directly from PDF to Excel. You can see that the data 'unwinds' with B1:C1 going to A2:A3 and so on.


Paste that same data to Word (below left), then copy from Word and paste to Excel (below right). The data stays in the original order. You can unapply Word Wrap and adjust the column widths to get back to the original data.


Technique 6: Change Formatting of Words Within Excel
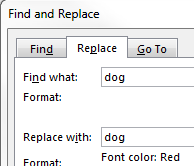
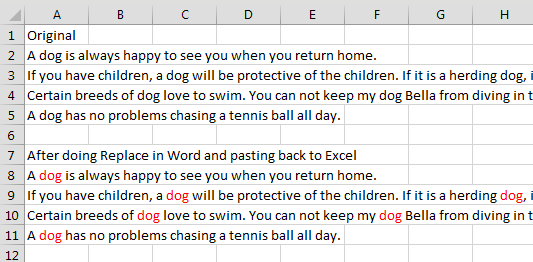
If you have sentences of text in Excel, it is possible to select one word while in Edit mode and change the color of that word. But globally changing the color of all occurrences of the word in Excel is tedious. Instead, paste the data to Word and press Ctrl+H. Change dog to dog. Click More>> and then choose Format, Font. Choose Red. Click Replace All. Copy from Word and paste back to Excel. The figure below shows what you end up with.
Technique 7: Replace While Keeping Character Formatting
Word also handles a similar problem: replacing text but leaving the text formatting as it is. Below is a survey about the best pet. Someone has highlighted certain words in the text.
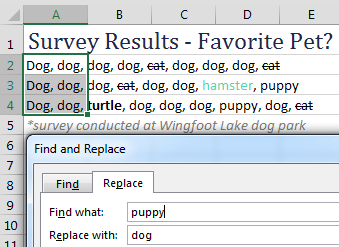
Use Ctrl+H to do a Find and Replace, as shown on the left. When you use Replace All, if a sentence was changed, your in-cell formats will be lost. In the figure below, the strikethrough remains in the first row because that row did not have an occurrence of the word puppy and thus was not changed.
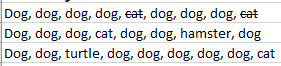
To keep the formatting in the original text, copy to Word. Do the replace in Word. Copy from Word and paste back to Excel.
Bonus Tip: Merge Shapes
Here's a brief plug for PowerPoint: If you need to create a shape in Excel that is a combination of other shapes, create the shapes in PowerPoint. Select all the shapes you want to include. On the Drawing Tools Format tab, choose Merge Shapes. You can then select Union, Combine, Fragment, Intersect, or Subtract to combine the shapes. (The Subtract feature lets you cut a hole in a shape.) Then copy that shape and paste to Excel (or Word).
Bonus Tip: Use the Eye Dropper
Another feature unique to PowerPoint is the eye dropper. If you want to use a particular color, you can just click the eye dropper on the color. When you open the Power Point color menu again, choose More Colors, and you can see the RGB colors. To use the eye dropper outside the PowerPoint frame, hold down the left mouse button and pick from any website or picture you have visible on your desktop.
Thanks to Katie Sullivan (a project manager on the Word team!) for contributing this tip. Katie clearly prefers dogs to cats. Thanks to Glenna Shaw and Oz du Soleil for contributing ideas to this tip. Zack Barresse and Echo Swinford pointed out the Merge Shapes option in PowerPoint. Sam Radakovitz added the eye dropper tip and noted the Subtract feature for shapes.
This article is an excerpt from MrExcel 2024 Igniting Excel
Title photo by Brett Jordan on Unsplash