AutoSum Doesn’t Always Predict My Data Correctly
January 04, 2022 - by Bill Jelen

Problem: When I use the AutoSum button, Excel sometimes predicts the wrong range of data to total. Below, AutoSum worked fine in F2 and F3, but in cell F4, Excel thought I wanted to total the rows above F4. How do I enter the correct range?
Strategy: After you press the AutoSum button, the provisional range address is highlighted in the provisional formula. Using your mouse, you highlight the correct range.

AutoSum will work correctly in F2 and F3. It will predict that you want to sum the data in that row. However, in cell F4, Excel has a choice: either sum the two cells in that column or the four cells in the row. Excel always chooses to sum the two cells above in this situation.
After you press the AutoSum button, note that F2:F3 is highlighted in the formula. This allows you to enter the correct range. There are three methods:
- With the mouse, highlight B4:E4 and press Enter.
- With the keyboard, type B4:E4.
- Using the arrow keys, press the Left Arrow key to move to E4. While holding down the Shift key, press the Left Arrow key three times to highlight B4:E4.
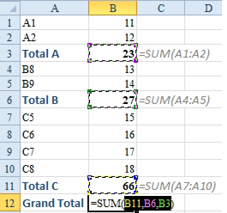
AutoSum can also fail when one number in your range contains a SUM formula. The provisional formula will offer to sum a formula extending up to but not including the previous SUM formula.
Alternate Strategy: You can choose to enter all the totals at one time by using the AutoSum button. This is faster than the methods just described and will eliminate the problem described. Follow these steps:
1. Highlight the entire range that needs a SUM formula.
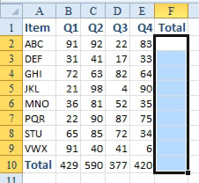
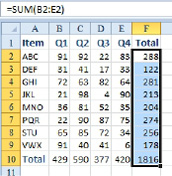
2. Press the AutoSum button. Excel makes a prediction and fills in the total formulas automatically. Excel does not show the provisional formula, so check one formula to see that it is correct.
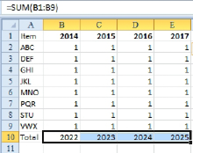
Gotcha: Headings that contain dates or numeric years can really cause problems for AutoSum. Excel will usually get fooled into including the heading in the sum. Be extra cautious when using AutoSum in these situations. Here, Excel incorrectly included the headings in row 1.
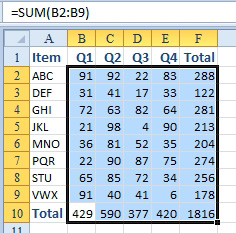
There is an amazing workaround. You can select the cells to be totaled plus one extra row and one extra column.
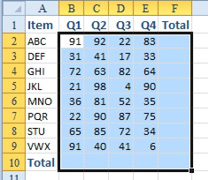
When you click the AutoSum button, Excel correctly adds SUM formulas in the total row and total column.
Another AutoSum oddity is shown here. The cellpointer is directly below a SUM function. There are additional SUM functions in the range that would normally be included in the AutoSum. In that case, AutoSum will only include the other SUM functions.
This article is an excerpt from Power Excel With MrExcel
Title photo by Shreyas shah on Unsplash
