Power Query Rules Used On Multiple Files

excelbytes

Active Member
Joined
Dec 11, 2014
Messages
291
Office Version
  1. 365
Platform
  1. Windows
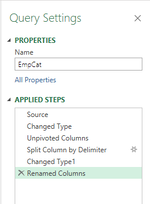
I'm not sure if this is the right forum to ask this question, but here goes. I create a series of steps for a table in a workbook to transform the data that was in a table. The steps are in the attached image. How can I reuse those steps in various other files, similar to storing a macro in a Personal.XLSB folder to use in any workbook?
 

Attachments

  • Steps.png
    Steps.png
    11.6 KB · Views: 5

Excel Facts

Copy formula down without changing references
If you have =SUM(F2:F49) in F50; type Alt+' in F51 to copy =SUM(F2:F49) to F51, leaving the formula in edit mode. Change SUM to COUNT.
I'm not sure if this is the right forum to ask this question, but here goes. I create a series of steps for a table in a workbook to transform the data that was in a table. The steps are in the attached image. How can I reuse those steps in various other files, similar to storing a macro in a Personal.XLSB folder to use in any workbook?
One way is to save the query in your My Data Sources folder which will be somewhere under your user directory. If you use OneDrive, it will be under C:\Users\USERID\OneDrive\Documents. To do this, from the Queries and Connections pane in Excel, Right Click on the query and select Export Connection File....
1678117725816.png

It will save the file file with a filename Query - QueryName.odc in your My Data Sources folder. Now, when you need it in another file, just go to Data -> Existing Connections, and you'll see a dialog box like this:
1678117972734.png

The GDP shortcut above is to a another folder that I keep certain Queries in. It's annoying that they all start with "Query - ", but I tried to stop that and it's just way to much trouble.
When you select a Query and then click Open, you'll be presented with the standard Load window, however no matter what state the query was in when it was saved, it will ALWAYS want to load as a Table in the Current Workbook and Add to the Data Model.
1678118213160.png

That is if you KNOW you'll want to use the query on a regular basis, and makes getting it a breeze, but it is a bit of a pain, and the list of Queries becomes obnoxious when it has a LOT of queries.
For the one off or maybe you'll use it again situation, it's easier to copy the Query in the PQ Editor and paste it into the new Workbook. In the source Workbook PQ Editor, Right Click on the query and select Copy
1678118689890.png

Close the PQ Editor, go to the Workbook you want the Query, select Data -> Get Data -> Launch Power Query Editor..., and Right Click in the Queries pane on the left and select Paste.
1678118996748.png


NOTE: With BOTH methods, if there are Queries dependent on the selected Query, they will be included in both the ODC query and the Copy/Past query. While at first that sounds like a bad idea, if you have a Query built using Merge as New, the two Queries needed for the Merge will be included.

Of course there's always using the Advanced Editor, Copying the code, then creating a new Blank Query and Pasting the code, but that's so 1990!

Note that the Export/Import method is REALLY USEFUL for Custom Functions. I had a project where I had to parse large Log files (text) that had a LOT of spaces used to align columns, and I needed to get rid of all the extra spaces. Once I had a function that could remove all extra spaces between words, I was able to Export it, and now have it at the ready whenever I need it. In fact the top 2 queries in the screenshot above are to create Data Model Calendars with a LOT of columns, and once imported only the start date (year - it will always start on Jan 1) and the number of years in the future are needed, and even has a place to set up non standard Financial Quarters.

Hope that helps!

p.s. Yeah, this was the right forum!
 

Attachments

  • 1678118613194.png
    1678118613194.png
    6.2 KB · Views: 3
Upvote 0
Wow! thanks for all the information. I do have one question:

When I went through the steps of option #1 and clicked on OK, it gave me an error because I was trying to use it on a table with a different name. How do I deal with that?
 
Upvote 0
Wow! thanks for all the information. I do have one question:

When I went through the steps of option #1 and clicked on OK, it gave me an error because I was trying to use it on a table with a different name. How do I deal with that?
So I take it that the Export and Import worked. If not, I'm not sure.
Remember, that what you Import is identical to what was in the original. I'm fairly sure the first line of the Query for Source= is pointing to a table that doesn't exist in the new file. The error probably looks like this:
1678124880312.png

Just Edit the query, go to the top (Source) line and edit it so that it's referencing the correct Table name. In this case CIP should be CPI. Correcting it will fix the problem.
If that's not it, more detail is needed. Remember to use XL2BB to post Worksheet data!
 
Upvote 0
No I don't even get that far. The original table that I ran the Power Query on was called EmpCat. When I open the new file, click into the table of the new file, select Existing Connections, I get this:
Image One.png
I select Query - EmpCat and I get this:
Image Two.png
I change it to New worksheet, click OK and I get this:
Image Three.png
It only creates a blank worksheet with Query - EmpCat in cell A1.

I don't know how to get to the source to change it in this scenario.
 
Upvote 0
No I don't even get that far. The original table that I ran the Power Query on was called EmpCat. When I open the new file, click into the table of the new file, select Existing Connections, I get this:
View attachment 86875
I select Query - EmpCat and I get this:
View attachment 86876
I change it to New worksheet, click OK and I get this:
View attachment 86879
It only creates a blank worksheet with Query - EmpCat in cell A1.

I don't know how to get to the source to change it in this scenario.
That is exactly what I said. The query's SOURCE is a table named EmpCat.
The file you're trying to use it in needs a Table named EmpCat or a table that matches in the number and name of the columns so that the rest of the code. If you have that, just replace EmpCat in the Source line of the Query with the name of the Table of the new Workbook.
If EmpCat wasn't created by Power Query, it would just have to be copied to the new Workbook. If it WAS created using PQ, its source needs to be available - preferably a less rigid source like a Web table or SQL query, you'd need that Query as well AND its Source.
 
Upvote 0
In my case I have a workbook that has 12 identical tables just with different data in them. Obviously they have to have different names. I was trying to come up with a somewhat automated process that an unsophisticated user can apply these steps to each table without having to go into the code and make table name modifications. Is there any other alternatives?
I think I misunderstood the question. It sounds like you want to reuse code for each of the 12 tables.
The direct but slightly painful way is to simply right click on the query and select Duplicate, then just change the Source to point to the correct table.
If you're pulling them into a new Workbook, just use Get Data -> From Workbook, point to the file with the 12 tables, but when you get the Navigator window, select the top "Folder" instead of one or more of the tables. That will bring in everything in the file - Tables, Named Ranges, and Worksheets. The info for those items will be presented in a table like this:
1678129662504.png

The Name and Item columns are nearly the same. The Data column is the actual data, Kind column says whether it's a Sheet, Table, or Named Range (DefinedName), and Hidden is whether or not the item is hidden!
In the picture above there are 7 tables, and their names all start with T_, so to get those table, filter the Name column (or Item column) for Text that begins with "T_". Then select the Data column and select Delete Other Columns, and then expand the Data (double arrow at the top right of the column). The data for all 7 tables will be combined into a single table. The old problem of headers being dumped into the data doesn't happen any more.
Note that you can do this using
Power Query:
= Excel.CurrentWorkbook()
, but that will only give you two columns - the content (data) of the item, and its name:
1678130305586.png

However, as long as you don't name the Table similarly to the tables you need - in this case name it something like Summary, anything as long as it does NOT start with "T_", you can do basically the same thing. Filter the Name column for Text Begins With "T_", delete the Name column if you don't need it, and then expand the Content column.
 
Upvote 0

Forum statistics

Threads
1,223,365
Messages
6,171,654
Members
452,415
Latest member
mansoorali

We've detected that you are using an adblocker.

We have a great community of people providing Excel help here, but the hosting costs are enormous. You can help keep this site running by allowing ads on MrExcel.com.
Allow Ads at MrExcel

Which adblocker are you using?

Disable AdBlock

Follow these easy steps to disable AdBlock

1)Click on the icon in the browser’s toolbar.
2)Click on the icon in the browser’s toolbar.
2)Click on the "Pause on this site" option.
Go back

Disable AdBlock Plus

Follow these easy steps to disable AdBlock Plus

1)Click on the icon in the browser’s toolbar.
2)Click on the toggle to disable it for "mrexcel.com".
Go back

Disable uBlock Origin

Follow these easy steps to disable uBlock Origin

1)Click on the icon in the browser’s toolbar.
2)Click on the "Power" button.
3)Click on the "Refresh" button.
Go back

Disable uBlock

Follow these easy steps to disable uBlock

1)Click on the icon in the browser’s toolbar.
2)Click on the "Power" button.
3)Click on the "Refresh" button.
Go back
Back
Top